
Even though I have several domains running through the Google Apps engine, I always forget how to set the custom instant messenger settings in my IM client. This week I start my MBA at Western Governor’s University and I noticed they are running on the Google Apps engine (which I am very happy about). When I tried to connect via Pidgin (my IM client), I ran into a few issues, so I thought it would be nice to do a quick tutorial.
[STEP ONE: Get IM Client]
For this exercise I am using Pidgin IM Client. I have been using it for a few years: it’s clean, fast, and not loaded with bloat-ware. Feel free to use what you want, but if you are a newbie I suggest following these instructions exactly.
Click HERE to download the program (don’t worry, it’s safe!)
Follow all of the default install steps – pretty simple.
[STEP TWO: Account Credentials]
I am going to assume you have your custom domain set up. If you want to know how to do that, I happen to have written a tutorial a few months ago (click here to read that).
Assuming you are reading this at WGU or another school that has “gone google”, make sure you have your school email account activated. If you can log into email, you should be good to go.
[STEP THREE: Configuration]
NOTE: For this example, I am going to use the Western Governor’s info.
1. When you first install Pidgin you will have an option to “ADD AN ACCOUNT”. Click that button. If you have pidgin already installed, go to the “Accounts” Menu and then select “Manage Accounts” and then click the “ADD” button.
2. You will now have an “Add Account” Screen:
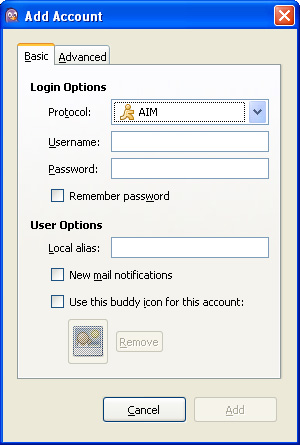
3. Make sure this screen has the following settings:
Protocol: XMPP (this is a drop down box)
Username: [Your User Name] – Example: jdoe (NOTE: Do NOT put your full email address in the Username field)
Domain: [yourdomain.com] – Example: wgu.edu
Resource: [You can leave this blank]
Password: [Your password]
Remember password: Make sure this is checked
Local alias: If you are using many accounts, it is good to put an alias in. Example: WGU
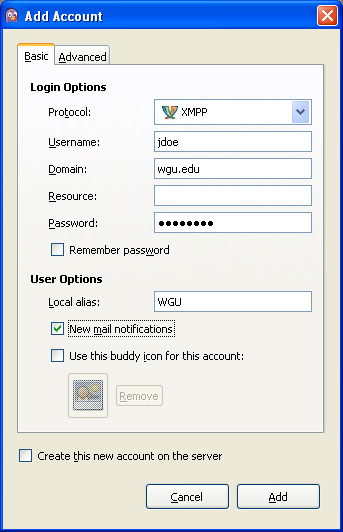
UPDATE (for WGU students only): To get some more features put “mychat.wgu.edu” in for the domain
4. Click on the top tab on the right – “Advanced Settings”:
Require SSL/TLS: [Not Checked]
Force old (port 5223) SSL: [Not Checked]
Allow plaintext auth over unecrypted streams: [Not Checked]
Connect port: 5222
Connect server: talk.google.com
File transfer proxies: proxy.jabber.org
Show custom Smileys: [Checked]
Proxy type: Use Global Proxy Settings
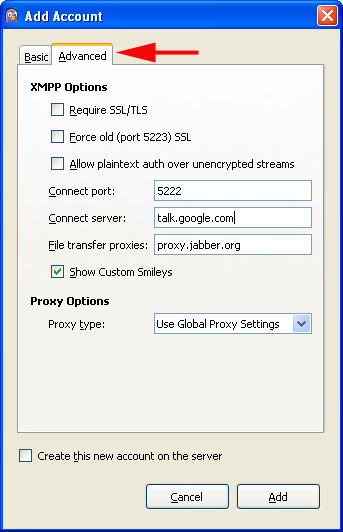
UPDATE (for WGU students only): Put in mychat.wgu.edu as the connect server too (this will give you access to chat conference rooms)
Click the “ADD” button at the bottom
You are done!
[STEP FOUR: Adding a friend]
1. If you want to add a friend, go to Buddies > Add Buddy (or just hit “Crtl” + “B” (for buddy))
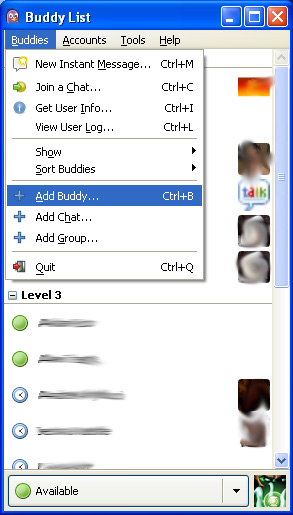
2. Add your new friend’s email address (this will work for your school, gmail, and anyone running Google Apps)
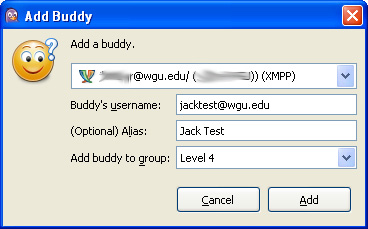
Click “ADD”
WGU ONLY: You are going to be asked to accept a certificate – just say yes.
Once your friends accepts the communication request, you are in business.